This article was originally published on Digital Image Magazine in February 15, 2011 and is preserved here for historical reference. While the tools or trends may have evolved, the perspective they reflect remains part of my journey in the photographic world.
Two of the most popular posts here on Digital Image Magazine are about photomanipulation. Sounds to me like photomanipulation is a popular topic with our readers, and so today begins a new series called “Photomanipulation Masters.” (The two posts are Photomanipulation Artistry by Louvre89, and How to Make an Anne Geddes Baby Portrait.)
First, let’s figure out what we mean by a “photomanipulation” (or “photomanip”). A photomanip can be a single photograph that has been altered (”photoshopped”) in some way. Usually this means much more than simple retouching. We’re talking head-swapping, huge eyes, big heads, that sort of thing. You can see many examples of this type of work at Worth1000.com.
Typically, though, a photomanip is a digital collage, a photo montage, of two or more images. When done successfully, it should look like a coherent image: the light source and color balance is consistent, nothing looks “cut out”. Photomanips require good, solid Photoshop skills, and a great imagination. The best photomanippers (new word, just made it up) have an uncanny ability to imagine how a given image can be altered and brought into a collage. Rarely are photos ready to go. You need to remove things, change the size, color, orientation…the list is endless. The end result can be something quite magical. It truly is an art.
Many digital painters (those who paint from scratch) look down upon the photomanipulator. They’ll ask, in a superior sort of tone, “Is that a painting, or is it *just* a photomanip?” My response to this kind of snobbery is: The image is everything; how that image gets made is beside the point.
This link will take you to a slide show of some of my favorite photomanips from Deviant Art.com. Check it out, and when you come back, we’ll take a look at our first master, Phatpuppy.
Phatpuppy
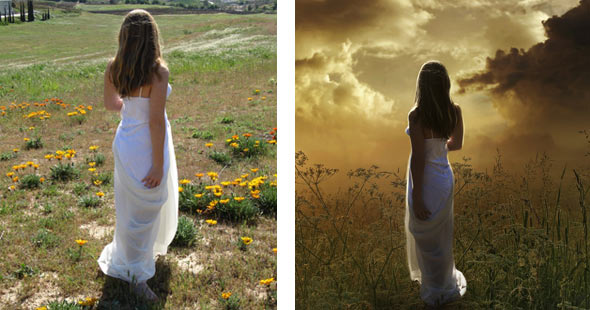
Perspectives, by Phatpuppy, on the right. Stock photo is by AoH-Stock on Deviant Art.
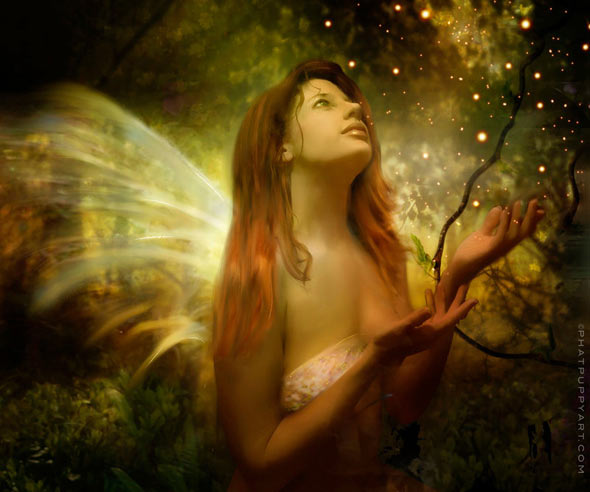
Phatpuppy (whose real name is Claudia) is one of the most well-known, popular, and prolific digital artists on Deviant Art. Her work is usually very striking and emotionally appealing, with a dreamlike, otherworldly quality. She creates a unique color scheme for each image, altering the colors from the original photographs. In the first example, above, (”Perspectives“), the final image is a combination of images. The main figure comes from the stock photo shown (by AoH-Stock, link). Now you can see what I mean when I say imagination is so important to this process. The artist took a rather ordinary shot and turned it into an extraordinary, glowing, appealing image. It has atmosphere, and drama. Let’s take a look at how she achieved this.
First, notice that just the figure is used from the stock photo, and the figure has been flipped horizontally. She seems to fit with the cloud shapes better that way. The figure in the stock photo is very close to the top of the frame. In the final image, her head is in the upper third of the frame. She’s positioned dead-center, and low in the frame, which gives the composition a gravity, a sense of meditation. She is obviously standing still, looking out. This is one case where it’s desirable to have a static composition.
The color scheme here is nearly monochromatic, with rich browns and dark golds. This works well with the subject matter, adding to the somber, sacred mood. As with many of the other masters we’ll be looking at in the weeks ahead, a limited palette is used a lot. If you’re just starting out with photomanips, you’ll find your task much easier if you stick to one or two colors. Often blue and orange are used (one of my favorites), for a dramatic look. It’s colorful, yet there’s only two colors.
Tip: You might want to try adding a Hue/Saturation layer at the very top, with Saturation all the way off. Compose everything in monochrome, at first. Once you’ve got your picture working, begin thinking of a color scheme. Don’t let the original photos force you into anything! You’re in charge. You decide what colors to use. One of the things I’ve learned from Phatpuppy is how to use color to unify a composite image, to create real visual impact.
Back to “Perspectives.” Notice how there are only three elements here: sky, figure, and grass. Simplicity, my friends. I’m working on an image right now with 30 layers and 10 different photos…I’m tearing my hair out! Keep it simple, is Phatpuppy’s message here. That’s what makes this image so powerful. And lastly, notice how she darkened the figure (check out the arm hanging down) to match the lighting situation. And then there is the “rim light,” as photographers call it, which lends a glowing quality to the edges of the figure. Just lovely. She added that whole glowing edge, yet it looks natural, like it belongs there. You can add touches like this, too. Just be bold. Don’t let those photographs boss you around. ; )
Here’s another before/after example for you to study. Quite a difference!
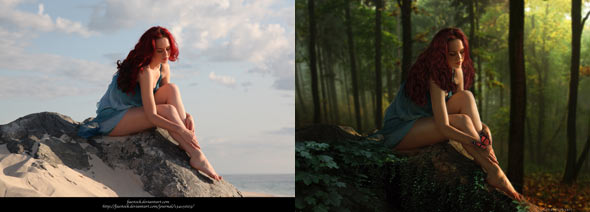
A Dream is a Wish, by Phatpuppy. Stock photo by Faestock (no longer on Deviant Art).
You can check out some of Phatpuppy’s Before/After gallery for more examples. Because photomanipulators on Deviant Art give links back to their source photos (they have to, according to site etiquette), you can study any image you admire to see what was used to create it. It’s an incredible learning tool.
I will leave you with one final image, another of my favorites. I invite you to check out Phatpuppy’s gallery (prepare to spend a good hour or more — there’s a lot to see!). Also, here’s a link to a tutorial that was just published on Worth1000, showing how to create a fairy image from a stock photo or two. Enjoy!
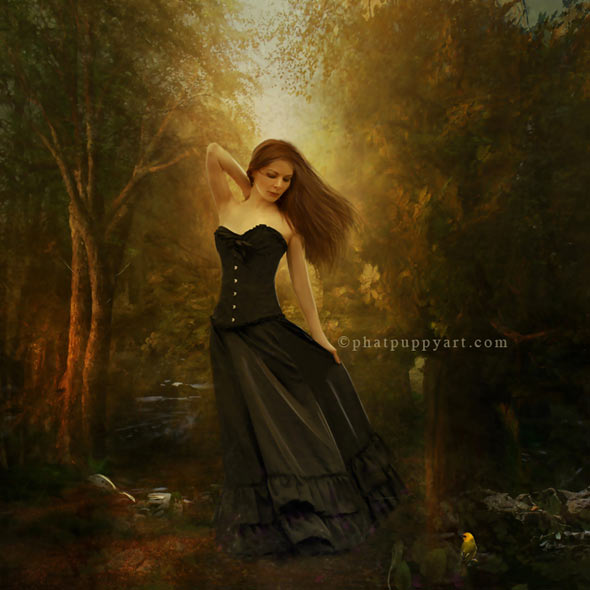
Walk With Thee, by Phatpuppy. Stock image of girl comes from Liam-Stock. Click on the image to go see the original stock photo.
For more creative techniques and digital artistry tips, explore the full collection of tutorials in Post-Processing.
