This article was originally published on Digital Image Magazine in Ma7 2011 and is preserved here for historical reference. While the tools or trends may have evolved, the perspective they reflect remains part of my journey in the photographic world.
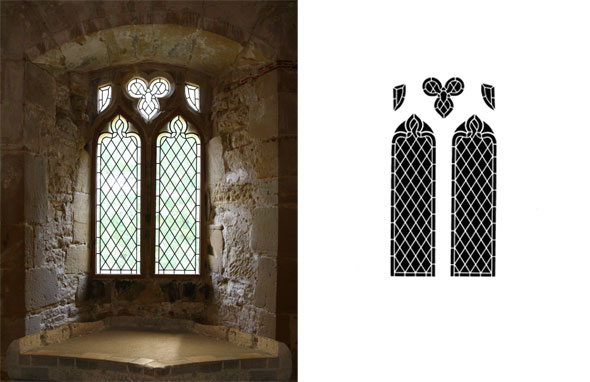
In Part 2, we’ll create the mask on the right from the image itself. This will allow us to have a new view out the window.
In Part Two, we’ll remove the window panes, so to speak, to give our lady in waiting a new view. Once the panes are removed, we can insert a new layer underneath, using any landscape or scene we choose.
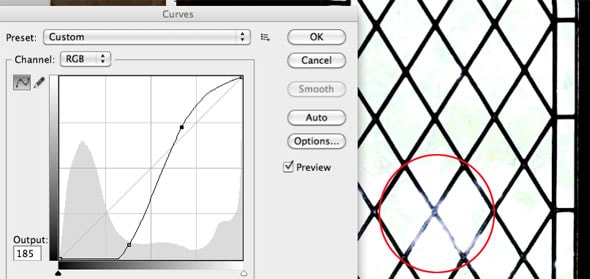
In order to remove the current pixels making up the window in our scene (begun in Part 1 ), we need to select all the panes. At first, the Select Color Range tool looks like a good choice, but it leaves too much unselected. Ditto with the Magic Wand and the Quick Selection tools. In this case, the view outside the window is very pale: almost white. Using the Curves adjustment tool (see below) we can push the panes to nearly pure white, and darken the cames (the leading between the panes) at the same time. Once we’ve done that, Select Color Range works like a champ. Note the area (circled in red) where the bright sunlight “blew out” the cames in a few areas. We’ll have to correct that next.

A curve adjustment increases the light areas and darkens the dark areas, which is just what we want. Now the Select Color Range will work much better.
Here’s the process:

1. Take the original photo and rename the layer it’s on to Layer 0, or “original photo”.
2. Duplicate this layer, and name it “working layer”
3. Apply a Curves adjustment to make the window panes nearly white, and the cames (leading) solid black.
4. Use Select Color Range to select the white panes.
5. Use Quick Mask (tap the q key) to make sure only the panes are selected. Then exit Quick Mask (toggle with q).
6. Invert the Selection: go Select > Invert.
7. Make the Original photo layer active. Click once on the Add Layer Mask icon at the bottom of the layers palette. This will create a layer mask that has the window panes masked out.
8. To fill in the gaps in the cames (circled in red, above), pick a hard-edged brush, and make it the same size as the cames (about 8 pixels, in this case). Choose solid black as the foreground color. Tap once with the brush, hold down the shift key, and then tap again on the other side of the “broken” came. Photoshop draws a perfectly straight hard-edged 8 pixel-wide line, replacing the missing black areas. Next, use the eraser tool to remove little bits of windowpane which are still hanging around. This goes pretty quickly. Once you’re done making the cames perfect and the panes completely empty, you’re ready to add a new background layer for our lady to look at.
9. Lastly, delete the “working layer.” Add back in the image of Elandria from Part One. Paste a new image as your bottom layer, for a new view outside. Here’s what we have at this point.

Try different landscape images till you find one that suits your vision.
Next week, we’ll look at how modify this image to really make it glow, using layer adjustments and painting. Thanks for reading!
Want to elevate your images beyond the moment they were captured? Step into the world of creative editing on the Post-Processing page.

