May 24th, 2011 | Published in Featured, Photoshop, Tutorials
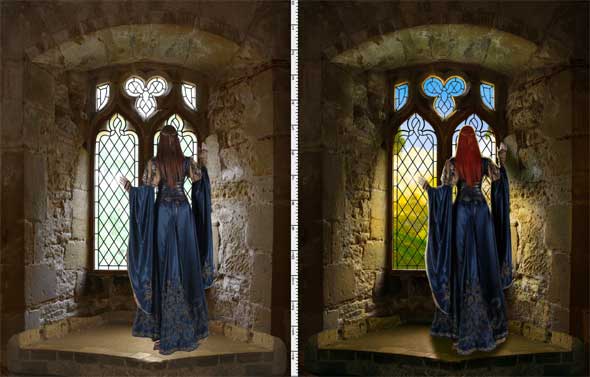
Before we begin Part 3, let’s do a quick review. In Part 1, we chose a photo of a model and an environment for her to “live” in. We added a third piece (a new floor) to complete the initial photo composition. In Part 2, we used the ornate stained glass window to create its own mask, thus “removing” the panes of glass. Now we can add a new background image, to serve as the view out the window. Today, in Part 3, we will add 17 layers to adjust the coloring and lighting, to change the image from Part 2 into something exciting and colorful.
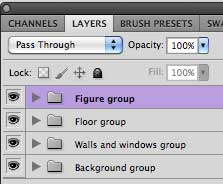
To help us stay sane, we’ll put the layers into groups, since there are 17 total layers.
Before you run screaming out of the room at the very thought of 17 layers, let me assure you it’s not as bad as you might think. Photoshop’s groups act like folders, which help us to organize the layers. Groups can really save your sanity. Here you can see the 17 layers arranged into four groups. The layers are arranged into groups according to the major object being modified. So, for example, the topmost group is the figure group, and it contains the layers which modify our lady in waiting. Here’s what is in the Figures group.

Clicking on the side-pointing arrow opens up the group. Here are the layers which make up the Figures group.
The very top layer is set to blending mode hard light. This is a blank layer, and the blending mode allows us to paint on her hair and brighten it up a lot. We also can shape the hair a bit, and add some queenly length.
Notice that the figure itself is on a transparent layer. We can use this transparency to clip (mask) layers above the figure. That’s what those right-angle symbols mean: a clipping mask is turned on. You can have more than one layer clipped by the bottom layer, as here (we have two layers being clipped by the queen figure). This means that we can only paint inside the area taken up by the pixel in the Original image layer (the queen). We can add a rim light (a glowing edge) by painting with an airbrush all around the upper edges of the figure, on a blank layer (see layer “rim light”). Turn on blending mode Linear Dodge (add) to punch up the glow. Don’t worry about painting “outside the lines:” the clipping mask won’t let you. Clipping masks are very helpful, and a big time saver. Once you see how they work, you’ll use them all the time.
The layer I lazily left named “Levels 3″ also uses the queen image layer as a clipping mask. Here, I’ve added a levels adjustment layer with a layer mask. The clipping mask restricts the levels adjustment to just the queen, and nothing else. The layers mask allows me to lighten, with the paint brush, the darkening created by the levels adjustment, in selected areas. This is a technique I’ve explained in detail in past tutorials, so I won’t spend any more time on it here.
The bottom-most layer in the Figure group is a simple blank layer, with dark, soft-edged shadows painted behind the queen. She overlaps the shadows, because her layer is above the layer with the shadows. Next we have the Floor group.
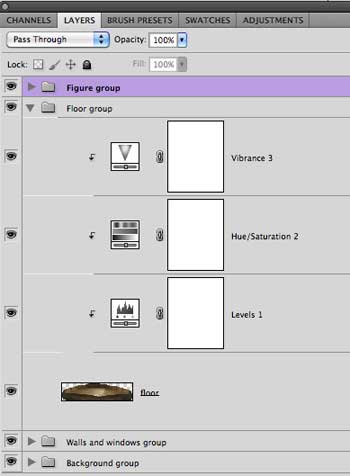
Here is the Floor group, opened up.
Here again, the floor object is on a transparent layer, so we can use it with clipping masks. This group is fairly straightforward: we just add three adjustment layers with clipping turned on. The adjustments modify the color, saturation, and hue. To turn it on, by the way, go Layer > Add Clipping Mask.
Next comes the much more complicated group, the Wall and Windows.
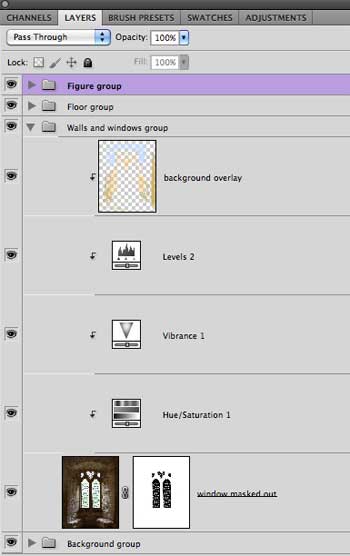
There’s quite a bit going on here in the Walls and Windows group.
The layer we created last week sits on the bottom of the stack in this group. Notice the layer mask we made, making the panes disappear. In this group, we are going to modify the walls and the windows only, not the view out the window. That we’ll save for last. Just as in the Floor group, we use three adjustment layers. The key here, though, is a blank layer set to Overlay blend mode. Paint on this layer to alter colors, brighten them, etc., without covering over the original pixels. It’s like painting with…stained glass! Kind of appropriate, I guess!
Notice that here, too, we’re using the clipping masks. In this case, that means we don’t have to worry about affecting anything that’s transparent in the bottom layer. We can’t get paint on the panes, in other words, because they are made transparent by the layer mask we created in Part Two.

The bottommost group is the Background group. This is only what is visible outside the window.
The fourth and last group contains the layers for the view outside the window. As such, they come last, so that everything else lies on top of the “view.” The only areas that show through are where we’ve created the layer mask in Part Two. The bottom-most layer in this group is an image I chose for the “view out the window.” I’ve also painted on this layer with an intense blue, which shows through nicely in the top windows. I’ve added a vibrance adjustment layer and a blank layer with yellow paint for the clouds. This yellow is supposed to look reflected in the room, on the walls. So as you work, you’ll be shifting up and down through the groups. It’s not a strictly linear process as I have shown here.
Photomanipulation, in fact, is a process of play and experimentation. Here we’ve had a look at the final result. But it took hours to come up with these 17 layers. Luckily, groups came to the rescue, and made staying organized a breeze. I hope you found this walkthrough helpful. The final step, for me, is to flatten the image and paint it in Painter and/or Photoshop. Here’s a close-up of the final result of the painting.
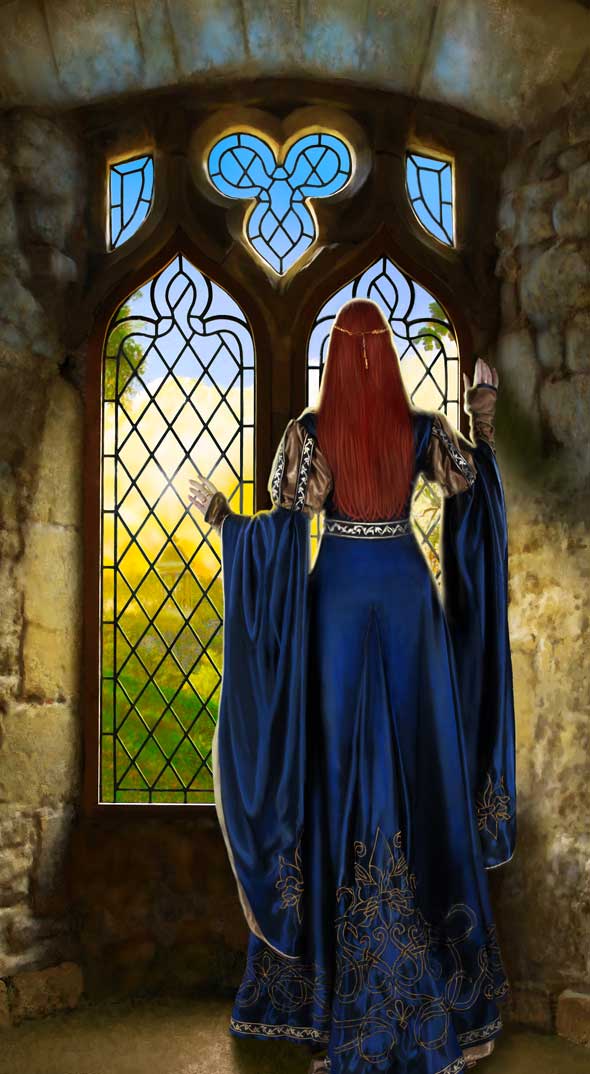
Painting close-up. Painting by Bob Nolin, with thanks to Elandria on Deviant Art for the use of her stock photograph.
Want to elevate your images beyond the moment they were captured? Step into the world of creative editing on the Post-Processing page.

