This article was originally published on Digital Image Magazine in November 2008 and is preserved here for historical reference. While the tools or trends may have evolved, the perspective they reflect remains part of my journey in the photographic world.
The Image Hose in Corel Painter is often misunderstood but is quite easy to use and customize with your own images. If you’ve tried it before, you might have wondered why you’d need to spray a series of images across your canvas. The real power of the Image Hose comes from creating your own custom nozzles, which can be very useful for tasks like painting grass, trees, or even a rock wall. I’ll show you how I created the stones image above using my custom stones nozzle.

If you’ve tried the Image Hose once and scratched your head, it’s probably because the included nozzles aren’t very practical. However, by creating your own custom nozzles, you can make the tool much more useful. For example, if you have a lot of grass or trees to paint, or need to create a rock wall, the Image Hose can save you a lot of time. Today, I’ll show you how to create a custom nozzle and use it effectively.
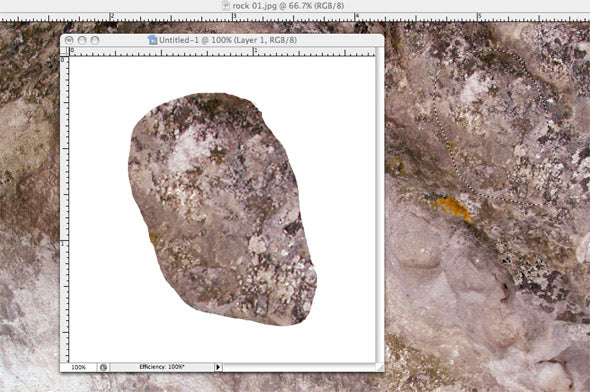
First, I’ll quickly explain how I created the stones. Each stone took about five minutes. Start by selecting a photo of a rocky surface, either one you’ve taken yourself or from a stock photo site. Use the lasso tool to select a roughly round shape and copy it into a new document.
Next, use the Liquify filter to push the sides inward, which will help create a 3D illusion. Then, apply the Sponge filter to add texture. The settings I used were Brush Size 0, Definition 24, and Smoothness 1. You can experiment with different filters and settings to achieve the look you want.

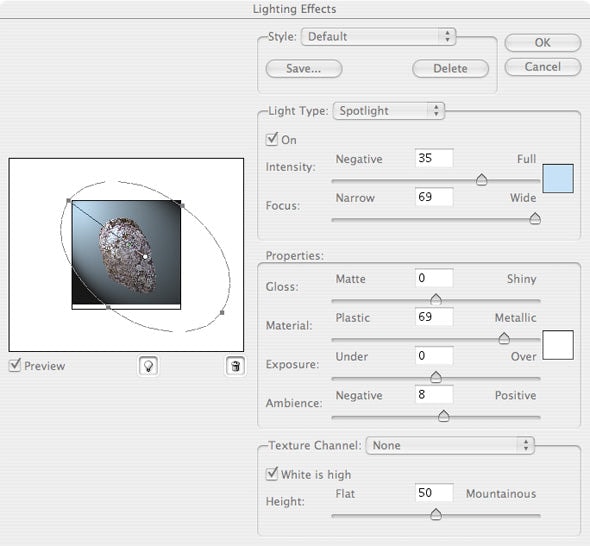
After applying the Sponge filter, use the Lighting Effects filter to add depth. You can choose a color for your light or stick with white. The placement of the light source is important—it should create a light side and a shadow side to enhance the 3D effect.
Next, you can apply a drop shadow to enhance the effect, but keep in mind that Painter can’t read Photoshop’s drop shadows. It’s better to create them in Painter later. You can also use the dodge tool to add highlights and further enhance the 3D effect.
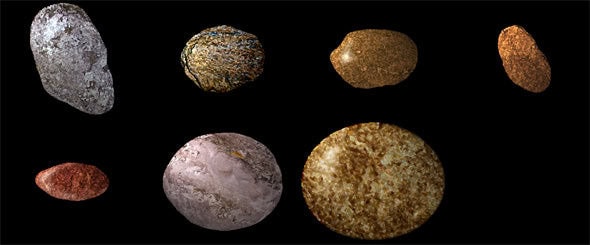
Create multiple stones using the same rock texture image by varying the shapes and lighting effects. Save each stone as its own file. Once you have six or more stones, drag each one into a single document, creating a separate layer for each. Save this document as a PSD file and open it in Painter. If you used layer styles for drop shadows, Painter will remove them. You can recreate the drop shadows in Painter by going to Effects > Objects > Create Drop Shadow.
After creating drop shadows for each layer, group the layers by selecting them all and pressing Command (Mac)/Control (Windows) + G. To create the nozzle file, locate the Nozzle Selector and click on the tiny triangle in the lower right corner to open it. Then, click on the triangle in the upper right to access the menu and select “Make nozzle from group.” Save the new file with “nozzle” in the title, like Stone nozzle.rif.
Congratulations! You’ve created your very own nozzle file. To use it, select the Image Hose brush, load the nozzle, and start painting with your new custom nozzle. This tutorial was a bit lengthy since it covered creating both the stones in Photoshop and the nozzle in Painter, but I hope it was clear and easy to follow. If you have any questions or something doesn’t work quite right, please leave a comment, and I’ll try to respond quickly. Thanks!
For more in-depth Photoshop tutorials and tips, check out our comprehensive Photoshop guide. For other photography tips and tricks, visit our Photo Mastery blog.
