Originally Published October 2008

Day turns into night with a click of the mouse: a portrait created with Vue Infinite.
Today we finish up our three-part series showing how to use Vue Infinite and Photoshop to create digital backgrounds for your portraits. In this final installment, we’ll take the daytime scene shown in Part 2 and convert it to a night scene. This is easily done by simply choosing a nighttime atmosphere from a list of supplied skies. I’ve also added a pirate ship in the distance, a candle for lighting, and some deck clutter. Let’s look at how to transform this into a night scene.
The atmosphere used here comes loaded with Vue. Go Atmosphere > Load Atmosphere, or press F5. Browse to the “Others” folder, and find Moonlight.
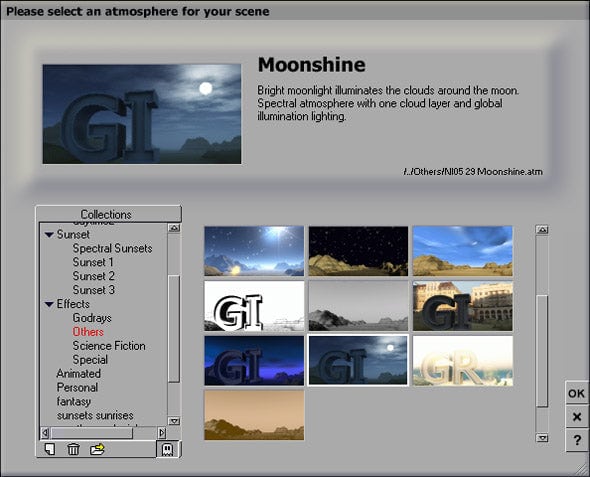
This atmosphere looks very nice, but the “moon” used here is actually the sun with some tweaking to make it “moon-like.” I decided to replace it with the moon object that comes with Vue. To do this, select the object “Sun light” in the Objects browser, lower right, and press the delete key.
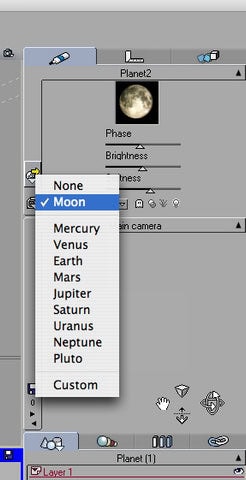 To add the moon, go Object > Create > Planet, or Shift + N. By default, the planet is the moon, but you can change this by clicking on the icon on the left side, as shown. Use the sliders to choose whatever phase of the moon you’d like, as well as its brightness and softness. You can grab the sizing handles and make the moon any size you’d like, and place it anywhere in the sky. To add stars to the scene, go into the Atmosphere Editor (F4) and click on the Effects tab. Adjust the sliders to control the number of stars and their brightness. The moon and stars will reflect nicely in the water. The source of light will come from a candle, which we’ll add next.
As I mentioned in Part 2, the Cornucopia 3D website is a great resource, especially for 3D models for your Vue scenes. The “C3D” community is friendly and generous. Some of the vendors actually provide free models, and I’ve used some of them here: the candle and the ceramic pitcher and mug are free models. The barrel is part of a set of “wharf clutter” by vendor Pamela Case, and it costs all of $1.50. The same vendor sells the dock we’re using here, for 75 cents. The pirate ship comes with Vue. The candle is the light source for this image, casting a very strong light on one side of our model. The original photo of the model, however, is not nearly so dramatically lit. In order to make her look like she belongs in the scene, I needed to do some work in Photoshop.
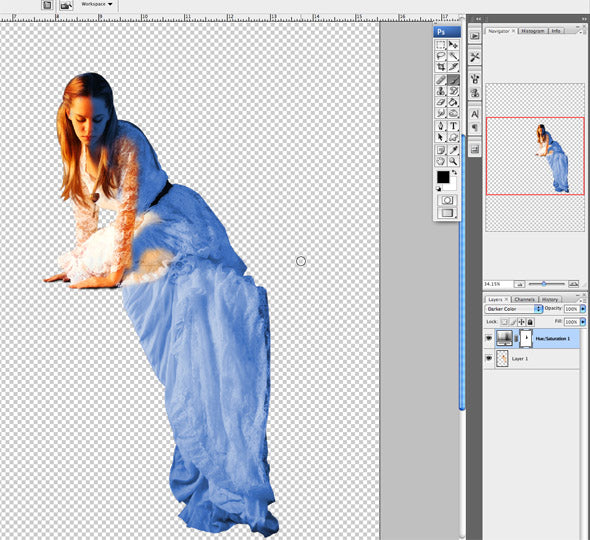
In Photoshop, I opened the original photo of the model, separated from the background, and added a Hue/Saturation adjustment layer (Layer > Add Adjustment Layer > Hue/Saturation). Click on the Colorize option in the Hue/Saturation dialog box, and move the Hue slider right, until the image turns a nice deep violet. Adjust the Saturation and Lightness to taste. In the Layers palette, with the adjustment layer active, click on the layer mask to select it. With a dark grey color, paint on the lit side of the model to block the blue color you’ve added. Paint where you know the candlelight would strike the model, sitting on the dock, and leave the rest dark blue. Experiment with the layer’s blend modes. I found that Darker Color worked well for this. After rendering the scene in Vue, I brought the image into Photoshop and pasted the enhanced model image on top of it. I used Edit > Transform > Scale to make the model match the image in the render. This results in a better, clearer portrait image, since the alpha plane image tends to get muddy looking. Use your alpha plane as a “placeholder” during the render, and then overlay it with the actual image in Photoshop. And that concludes our series on using Vue to create a background. Hope you enjoyed it!
Explore More:
If you enjoyed this tutorial, be sure to check out more tips and tricks on my Photo Mastery blog. For inspiration, dive into my Wall Art blog and explore curated galleries here. Don’t miss out on my exclusive collections, featuring captivating Urban Photography, stunning Black and White Photography, breathtaking Natural World Photography, and evocative Bygone Era Photography. Each piece tells a story—find the perfect one to complement your space.
